“Mark it Zero!”

The story behind the game begins in the middle of the sickness many of us have. I wanted another game. Not because I needed one but more because I was building a new Pinball game room and would now have space for many more games. I happened to see a game called “Strikes ‘N Spares” for sale on Ebay as I was looking for other, non-related Pinball parts. I had never seen the game before and quickly switched to Pinside to research it. My wife was involved in bowling in her younger years and I figured she might even enjoy this as much as Pinball. Hey, anything that interests her around the subject is worth pursuing!

Strikes ‘N Spares bowling pins

After a few forum searches on Pinside I discovered a few things about the game I didn’t know. First, the price of sold games from Pinside was about half what Ebay was (no surprise) and second that the game seemed a little “rarer” even than the number manufactured would suggest. I dug a little deeper.

Oh, THAT Strikes ‘N Spares

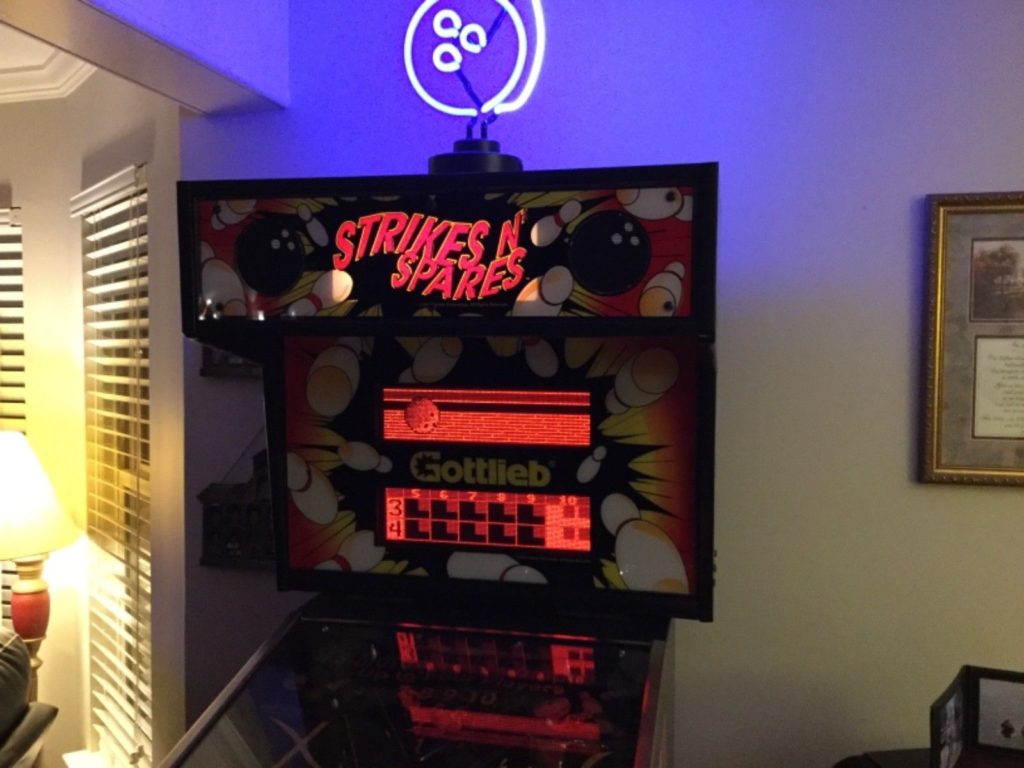
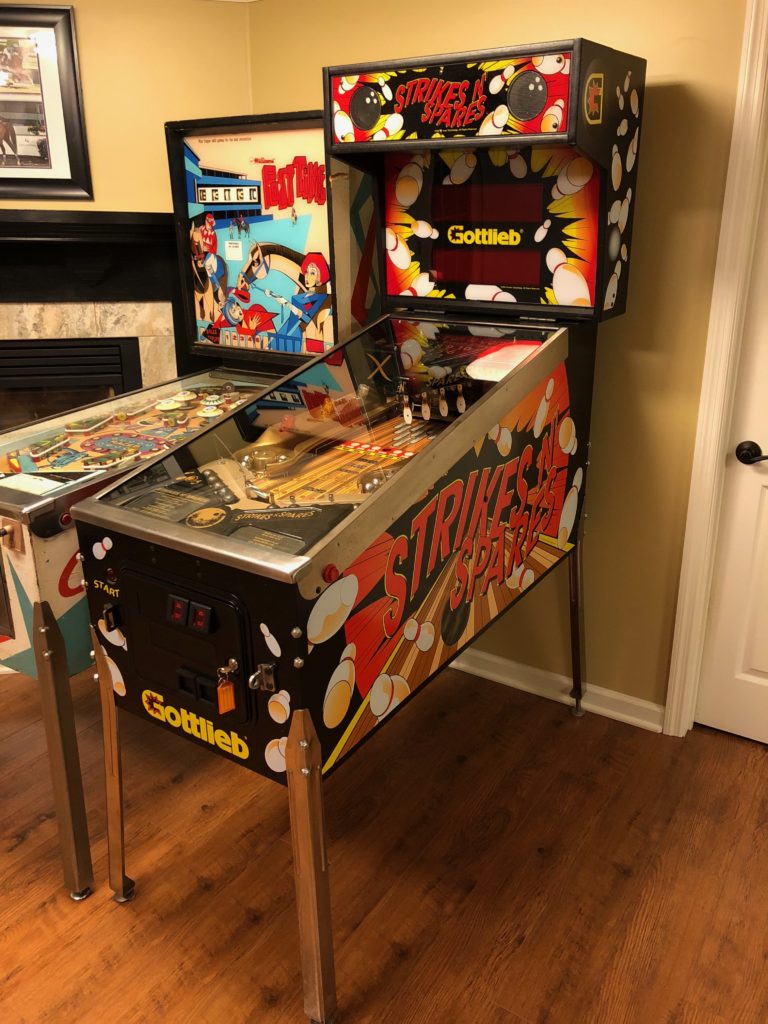
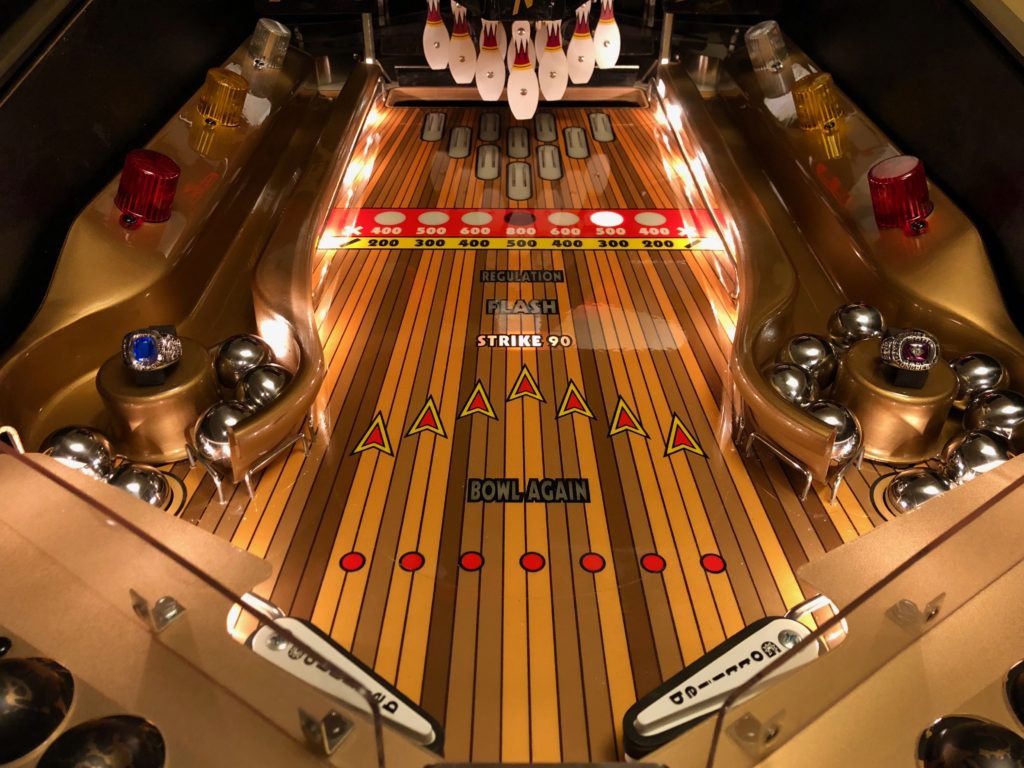
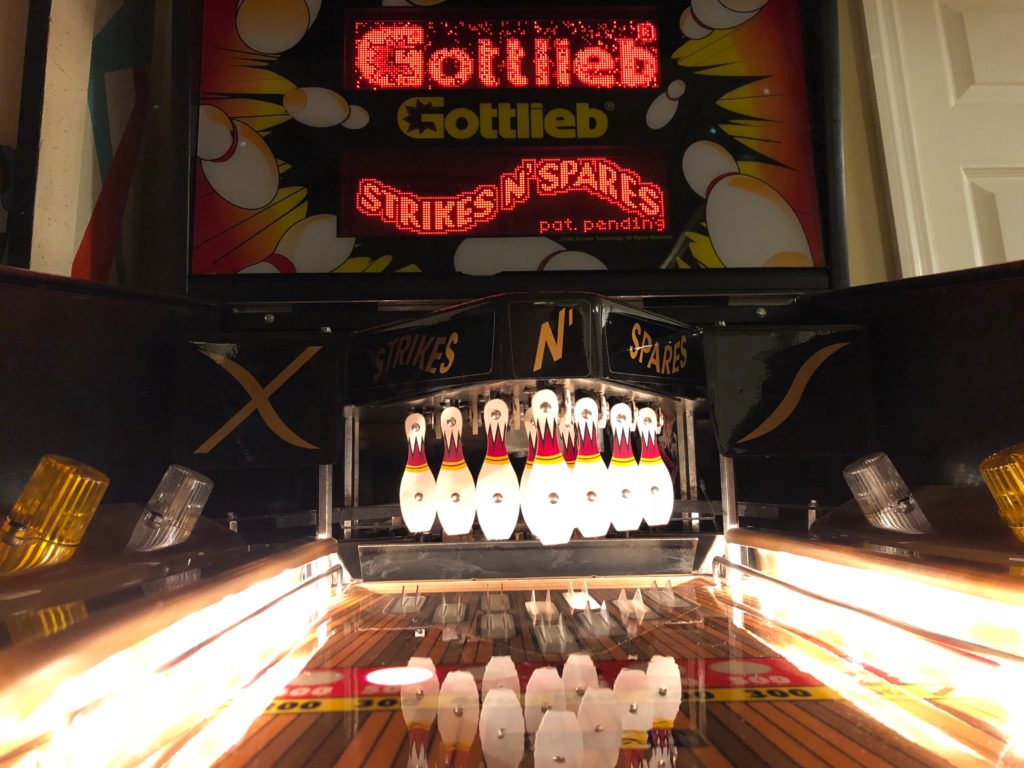
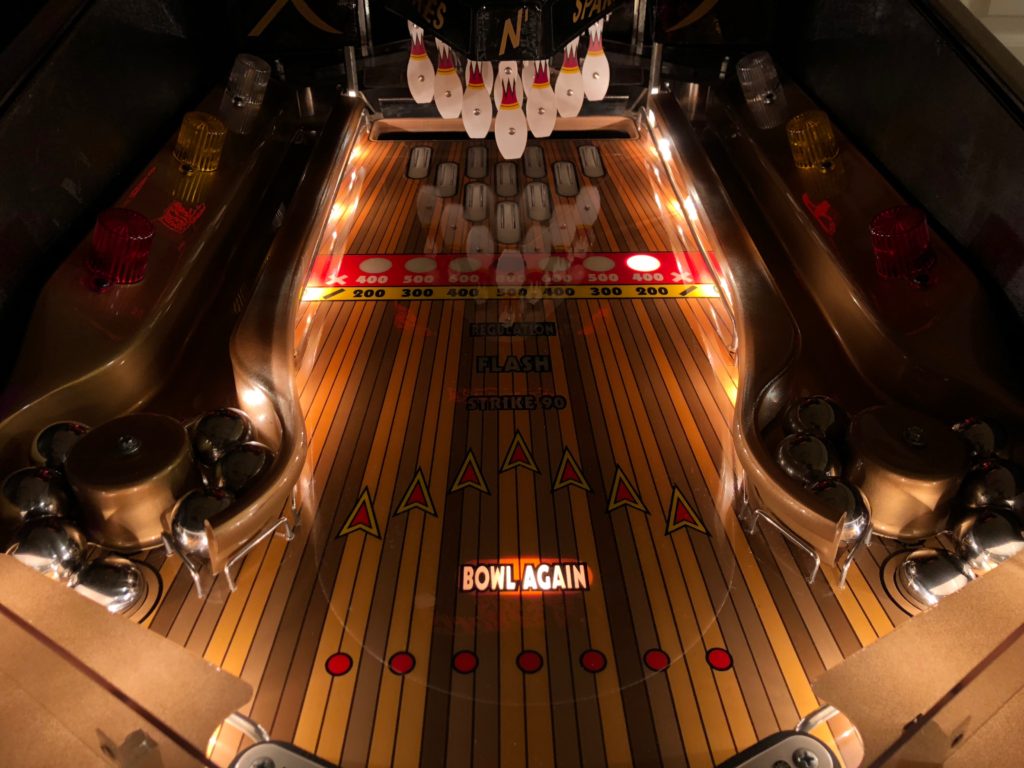
Strikes‘N Spares is a game made in 1995 by Premier Technology under the trade name Gottlieb. They made just 750 of them. It’s a game that is listed on IPDB, Pinside and other Pinball related sites even though it’s not a Pinball game. It doesn’t play like a Pinball game. It doesn’t score like a Pinball game and you probably will not play it “alone” much like you do your other Pinball games. Later in this post, I’ll explain why despite all that … I have no plans to ever sell it. It’s a very cool looking game that emulates the feeling and look of a real bowling alley. The lighting is subdued but it’s also very dramatic. Hard to believe how they achieved that dramatic “look” with just a handful of incandescent lamps. The bowling alley is complete with dual ball return lanes – one on each side. The player can bowl “left” or “right” handed depending on which flipper they choose.

Strikes ‘N Spares vibrant black and red cabinet art

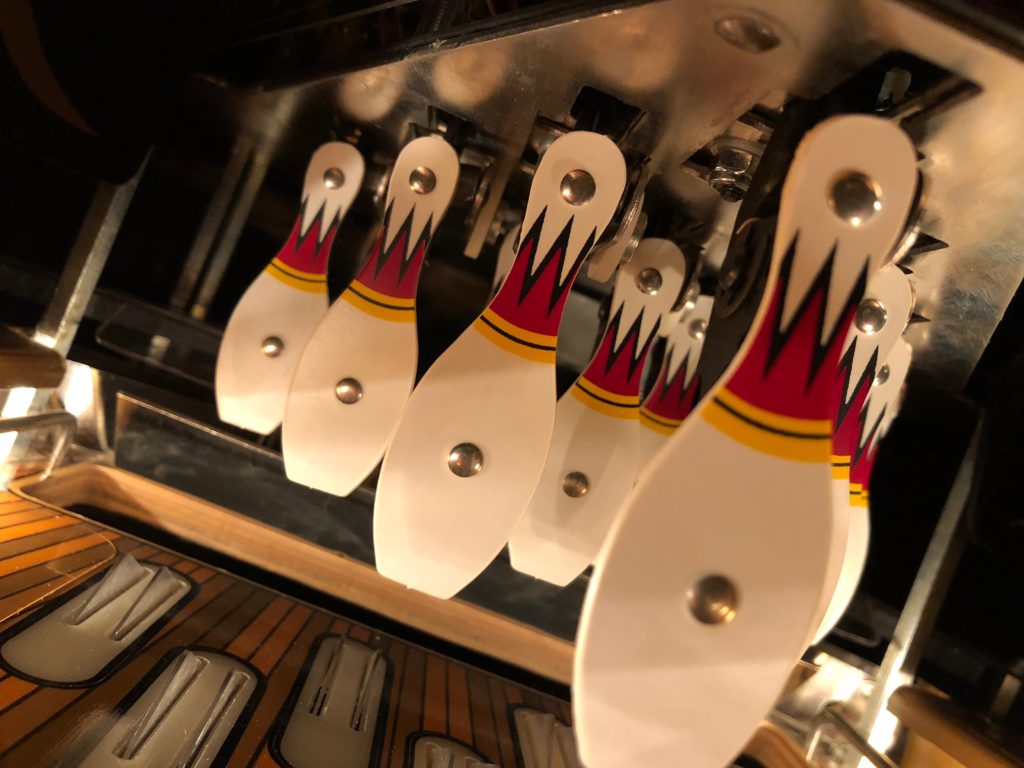
The artwork is super simple but as with the lighting somehow very dramatic. The alleyway has the exact (though miniaturized) appearance of a freshly oiled hardwood bowling alley lane. The sounds in the game do a VERY convincing job of making you feel like you are really at a bowling alley. When you flip (bowl) you hear the ball hit the lane with a solid “thump”, then hear it rolling down the lane. When you “hit” the pins, you hear them rattle and crack against each other just like at a bowling alley. As the ball makes it’s way back to you in one of the 2 return lanes, you hear it approaching as well. Just like the real thing. The game uses 14 (yes you read that right) pinballs. 6 of the total (3 per side) will just sit at the side of the ball return and never be used at all – they are just decoration. When you “bowl” the balls never make contact with the pins above them. The pinball rolls underneath them, pushing on plastic rollovers that then make contact with a switch below the playfield, telling the logic board to “flip up” the pins above the ball. It happens so quickly and elegantly that it really looks like the pinball has hit them and knocked them over. So well done!

Ebay listing image for the machine I purchased

Let’s Make a Deal!

I searched the Pinside market looking for one for sale. I private messaged a few folks that had one for sale and showed it as “not sold” on Pinside. No luck there as one was sold to a local friend and the other was long ago sold to another collector. So back to Ebay I went. There were 2 machines on Ebay at the time and there was another in one of the Facebook Pinball Marketplaces. Interestingly, one of the Ebay machines was located just down the road from me in Chattanooga. I emailed the gentleman and pitched a price to him for a sale “outside of Ebay”. Many Pinheads advertise their machines both locally and on Ebay at the same time so I thought what the heck, I’ll give it a shot. This machine was the best of all 3 that were for sale at the time. From the pictures, It looked like it was in absolutely perfect condition. I shot an offer to the seller through Ebay. It was significantly less than the selling price but … no shipping for the seller and no Ebay fees. Sadly, the offer was promptly rejected.

Underside of playfield of my machine – looks new!

I then messaged the seller hoping we could make a deal outside of the Ebay network. After all, I was so close to him. I heard back from the seller that he would prefer to just let the listing ride until over. I also quickly heard back from Ebay that I had better not be making offers to purchase outside of Ebay. They are no fun anymore. I’ve been listing with them since the late 90’s but boy have the rules changed since then. So I waited. While I waited I cooked up several hair brained ways that I might get my hands on one of the other 2 Strikes ‘N spares available. Each of them were almost 8 hours away by car and neither sellers would ship. Driving that distance (and back!) didn’t seem to make sense when there WAS one just 60 minutes from my house. So I waited some more. Finally the auction ended. The game was not sold. I emailed the seller again and we began to negotiate price. I ended up paying much more than the average sale price of Pinside and a bit less than his advertised price on Ebay. I was happy with the proposed deal and we set a day to shake on it and for me to take possession of the game.

Coil and switch chart cards still in pouch inside machine

A Pleasant Surprise Pick-Up

It happened to be a weekday evening that worked out for both of us. I got home at my normal time, changed into my Pinball pick-up clothes and hit the road for the one hour trip to Chattanooga. The weather was threatening. I brought tarps and straps just in case. I arrived on time and was greeted by a super friendly, very Pinball enthusiastic guy. We shook hands and I entered his well-kept, super clean house. Turns out he has 3 or 4 machines. Several are never going anywhere. Tommy and an older EM are those titles. He also has one machine that he will trade out from time to time to keep his collection fresh. His “never-going-to-trade” machines are all upstairs and the trade when I’m bored with it game sits downstairs near the living room. The Strikes ‘N Spares was that machine.

Inside of cabinet in “as-new” condition – amazing for 23 year old game!

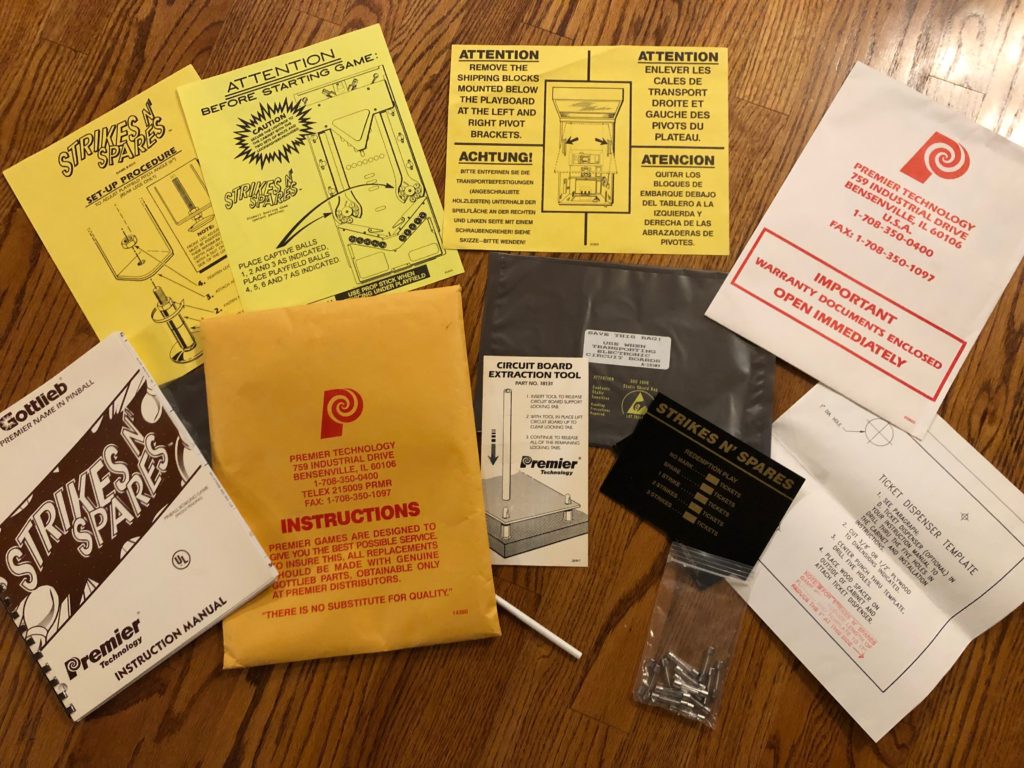
The pictures did not lie. The machine looked brand new. Like right out of the factory new. The counter showed 435 games in total. Before we even turned it on we started talking about Pinball, the hobby, collecting. Repair, etc. He invited me to see his other games. The Tommy was super nice and I could see why he wanted to keep it. We talked for a bit and then it was back down stairs to inspect the Strikes ‘N Spares more closely. I turned it on, played a few balls.It worked perfectly. It sounded perfect. I looked perfect. I said that I would take it and handed him the agreed upon amount. He left the room for a moment and returned with the manual, all the original factory paperwork, bulletins and spare parts that came with the machine. I swear, it was like going to the Gottlieb factory and buying a new machine.

Every piece of documentation that came with the game new

Rain Chases My Games

The next steps were to begin to disassemble the machine for transport  pickup. I’ve bought so many machines that I go everywhere prepared for this part of the process. You would be surprised how many households not only don’t have a 5/8th box end wrench, but may not even know the legs come off. I had all my usual stuff: Shrink wrap, wrenches, socket set, 4×4 post, spare head lock, pliers, small drill, zip ties, cardboard, wire cutters, blue tape, etc. My seller was impressed. I call it prepared. As prepared as I was, I’m not sure I could have figured out exactly HOW to fold the head down on this machine. Thankfully the seller in this case had a thing or two to show me. He knew that it was a compound hinged head and exactly how to unlock and safely fold it flat. I’m thankful he had that part down.

Loaded and ready to head home – just before a storm

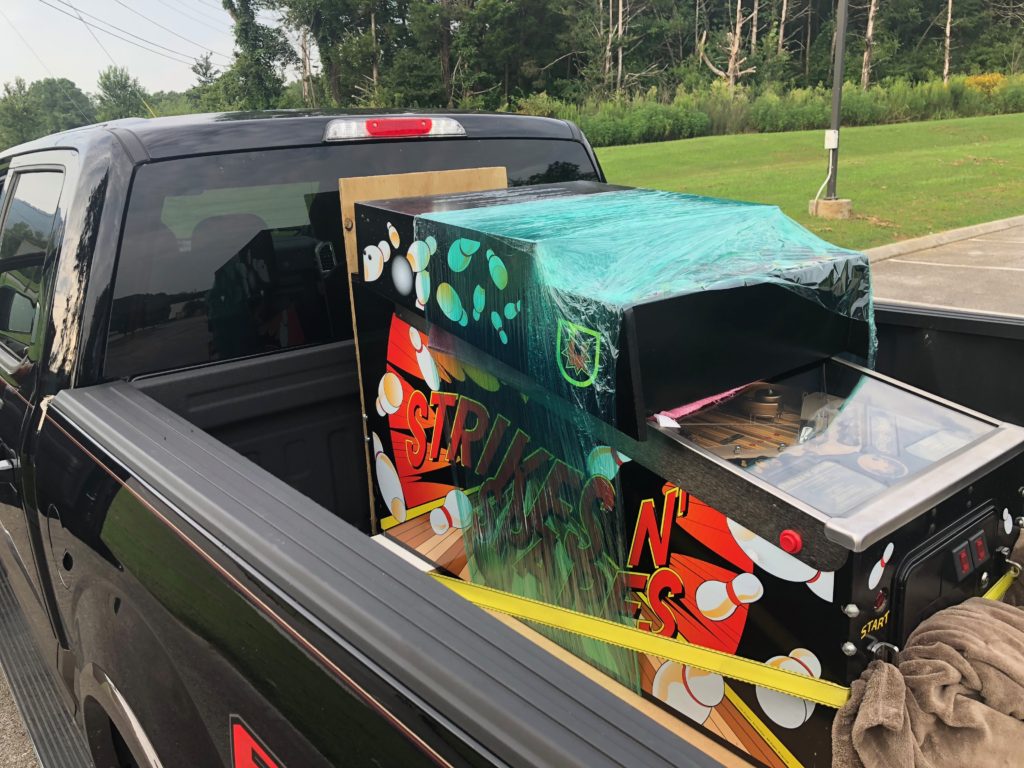
With the game folded up and wheeled out to my truck it was a quick load and I was on my way. I pulled over in a school parking lot not far from his home to double check my tie downs and to quickly check my Doppler radar. It didn’t look good. I was having flashbacks to my trip to Nashville to pick up my Williams Fire Pinball machine. There was definitely a thunderstorm ahead of me. I was just west of downtown Chattanooga and the storm was just crossing the spot where I75 and I24 intersect and I would be coming to that spot just behind the storm. Oh well, had to get home somehow so with the load secured I pulled out of the lot and headed north. The radar map was spot on.Thankfully, I had just missed the storm and much of the water had already drained from the roadway so there was no spray getting to the game. As I drove north on I75, I could see another thunderstorm brewing and tracking alongside the highway – I just got ahead of that one. I could see the lightning and very dark clouds in my rear view mirror. The rest of the trip was uneventful. I arrived home and it was dark. I unloaded the game (alone), wheeled the game into the house (alone) and then set it up (alone). I don’t mind working alone. I like myself. I don’t get lonely easily … but DANG there are some parts of the pinball hobby that demand an extra pair of hands!

Game set up and ready for play

23 Years Old/New

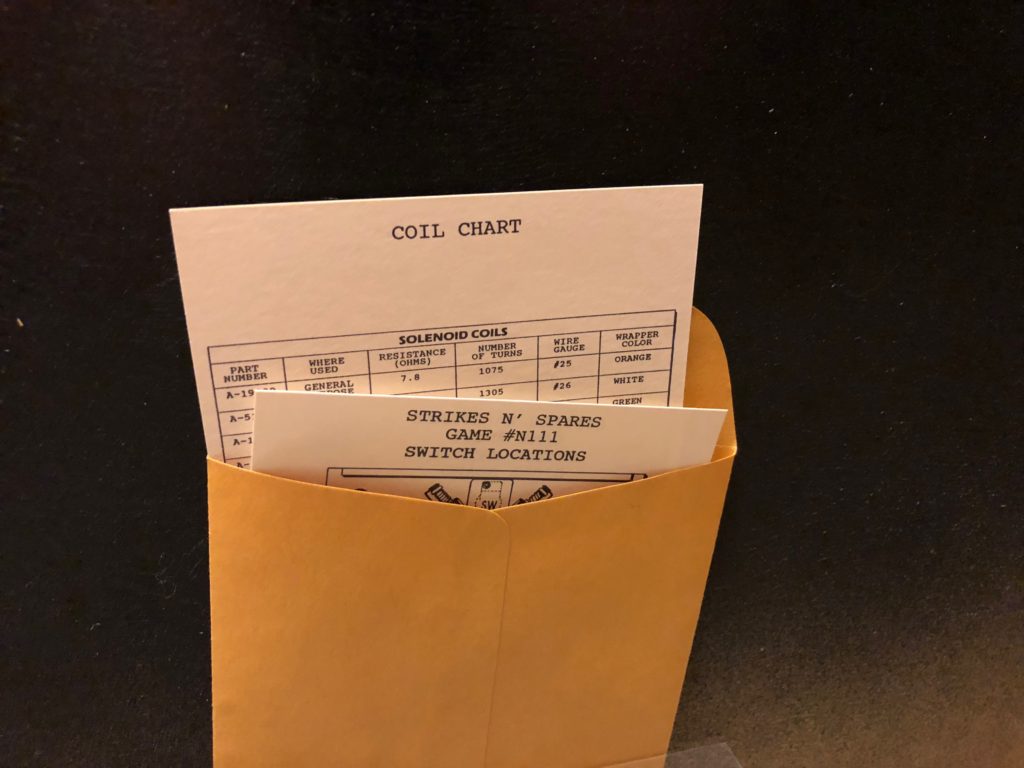
Now that the game was setup and operational, I could take a few minutes to do a close inspection. It was even cleaner than I remembered at the sellers home. The inside was immaculate. The switch and coil location cards and the card holder were still stapled inside. The playfield was nearly perfect (more on that later). The cabinet art was as good as I’ve seen on any game that was 23 years old. The reds were vibrant, the blacks scratch free and deep black.

Looked new inside – still has Premier business card stapled inside

The only issue I saw that I wanted to address was just ahead of the flippers where the playfield did not have any mylar. There was some minor scuffing in that area. I knew to look for that because if a Strikes ‘N Spares has any play field wear – that’s where it will be. The ball doesn’t come in contact with ANYTHING on the playfield except the flippers (OK, so it does roll over some plastic pieces under the fake pins to activate switches). So if wear is to happen – that’s the spot, right in front of the flippers. The other contributing factor is that the spot where players will “flip” is almost the exact same spot each time – very unlike a Pinball game. The reason is simple. This is not Pinball, it’s bowling and you aim for the same spot every time. No matter. There wasn’t any real damage, only the light scuffing.

Cabinet art was nearly perfect

The Mod Jobs

So a quick wax job was completed and most of the scuffs in front of the flippers were now gone. It was time to create a custom cut piece of mylar to place in the front part of the playfield to protect the only section that was left exposed at the factory. My process for that is simple. Use printer paper to create a template, then use that template to trace and cut the mylar. This took a bit longer than usual because the factory mylar has a very graceful curve to it right in front of the flipper gap. The new piece of custom mylar must be cut to tightly mate with that curve without overlapping. Too loose and that gap would eventually be dug into by the ball and remove paint/artwork. Overlap at all and you’ll create ball hop.

Adding mylar to flipper area using a paper template

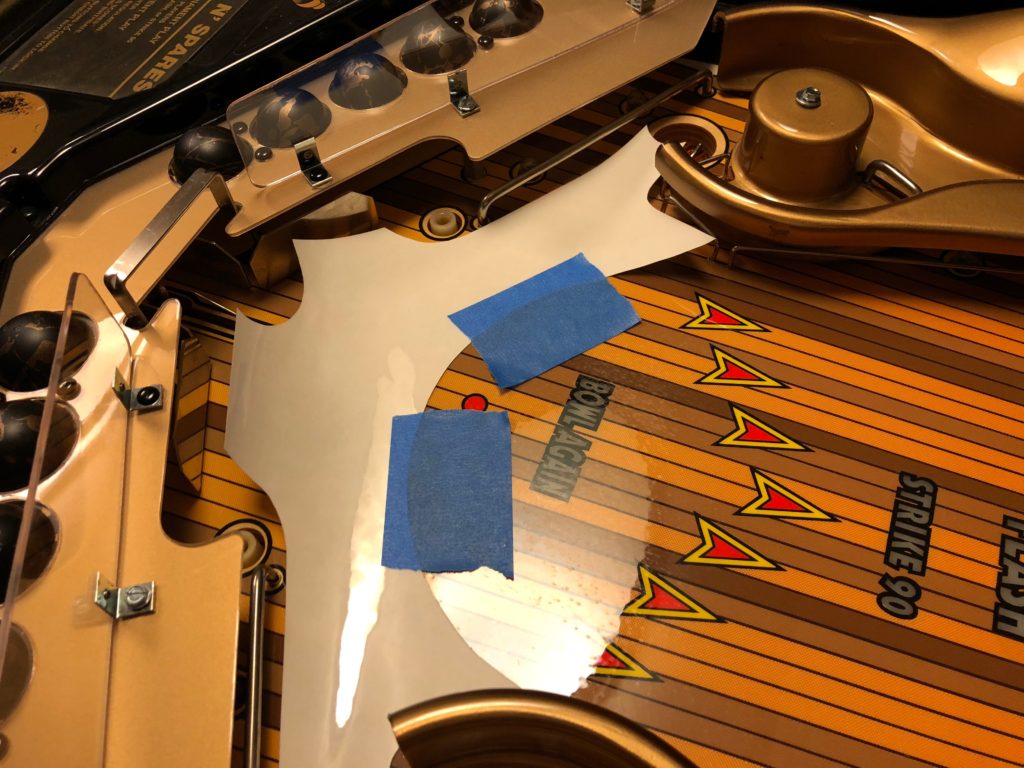
I finished the template, traced and cut the new mylar and VERY carefully installed it. The tight fit and the need for near perfect alignment made the installation both nerve racking and lengthy. I had to re-position the mylar 3 or 4 times but was finally satisfied that it was aligned and pressed it into position. It was perfect. It plays that way too. Like it’s not there.

After mylar and after bowling rings installed

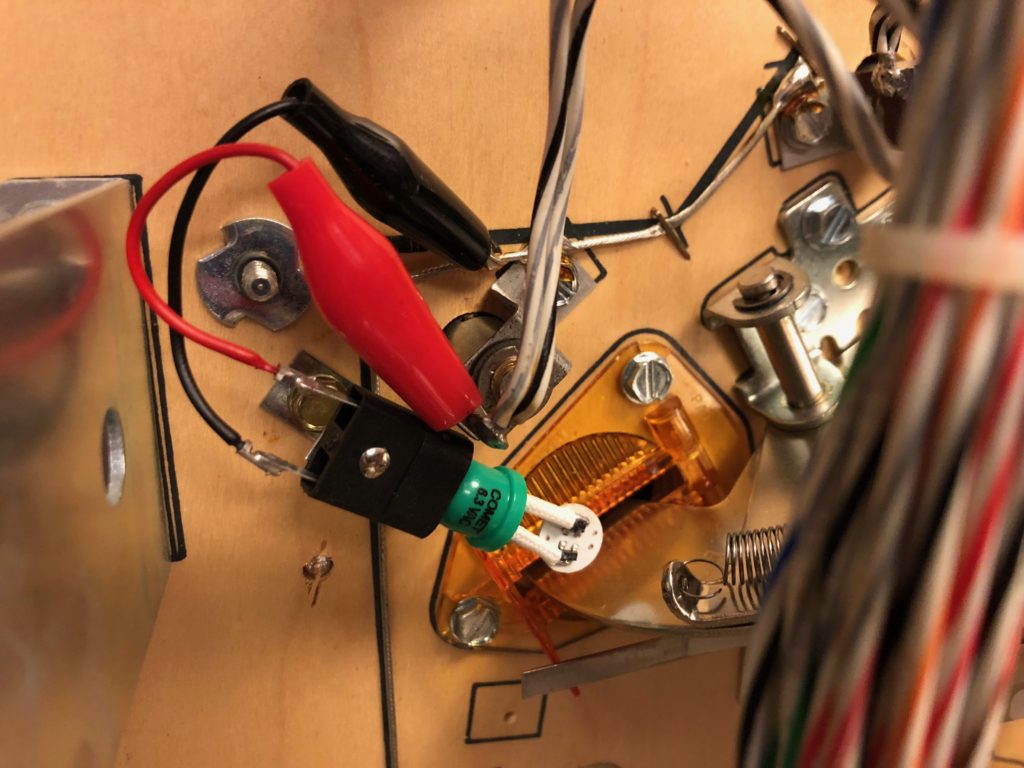
Other than minor cleaning there really was not a lot that this machine needed. There WAS however, a few things I wanted to do to spice it up. Now if you want to mod your Metallica, there will be a thousand posts just on Pinside to guide you or give you some ideas. If you want to mod a machine that’s not really a Pinball and there were only 750 made … you’re more likely going to be on your own. Thank God for Todd Tuckey! He has had a few of these through the years and in one of his videos he had added green LEDs to the two troughs that hold the “bowling balls”. I liked the look so I proceeded to do the same. If you raise the playfield on a Strikes ‘N Spares, you’ll see that the area where I placed the LEDs looks as if the factory had originally considered adding lighting there as well but decided against it. I couldn’t use the factory drilled locations and had to drill new mounting holes. I used a 1/6th inch bit and drilled just about 3/16th inch into the playfield, one mounting screw and I had my LED bayonet mounts in place in no time. Next it was time to add some “lectricity” and I did that with some Comet quick connectors and alligator clips.

Adding green LEDs to ball trough areas

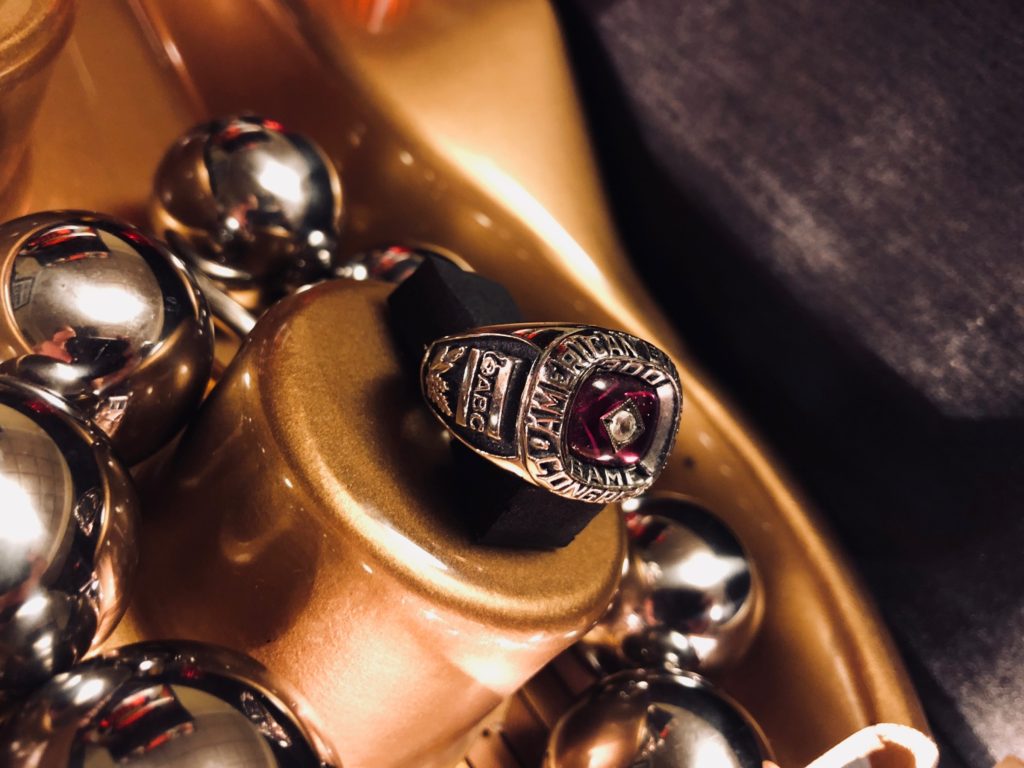
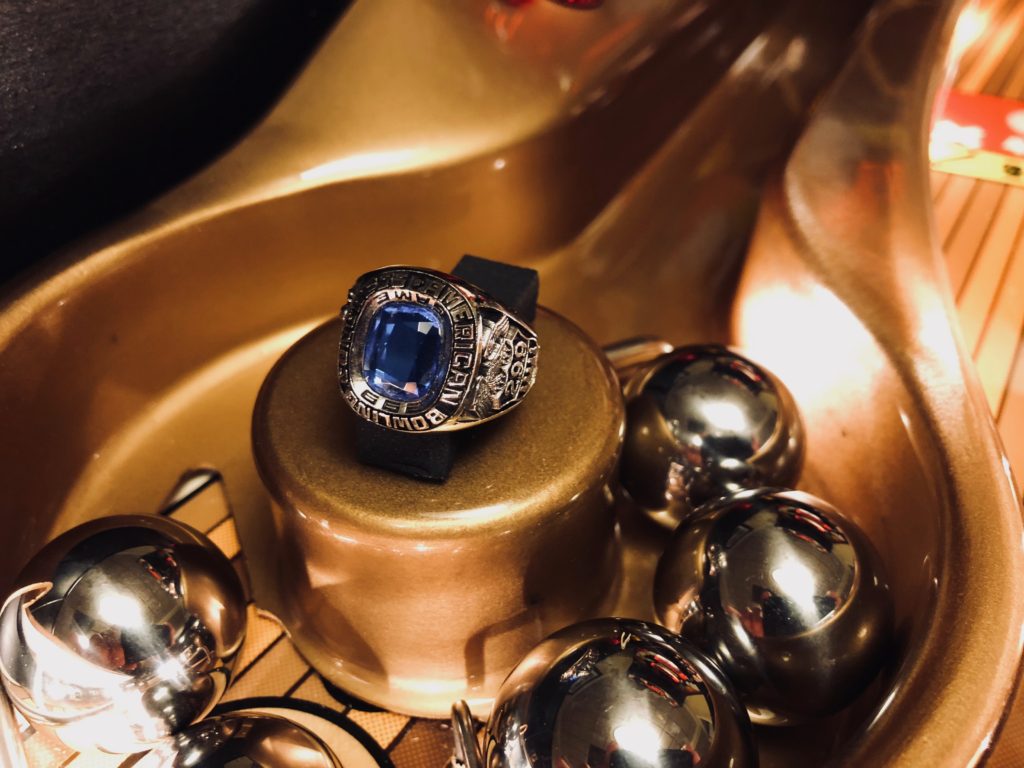
I scoured the internet for other mods that folks might have done to this machine, and came up mostly empty handed. So striking out on my own I started to run searches on Ebay for bowling related memorabilia. I got a hit. 300 rings. There were lots of them too. None too expensive and in a few minutes I found a few to purchase and I had a spot on the game located for them. Right at the ends of the ball returns. So I bought an ABC 300 ring (red stone) and an ABC 299 ring (blue stone), then installed them on top of my ball returns. Each of these are engraved with the names of the original owners from 1988 and 1995 respectively (1995 being the same year SnS was made). They are a nice conversation pieces and don’t block the view of the game in any way

American Bowling Congress “300 game” ring from 1988

Bowling ‘er Gameplay

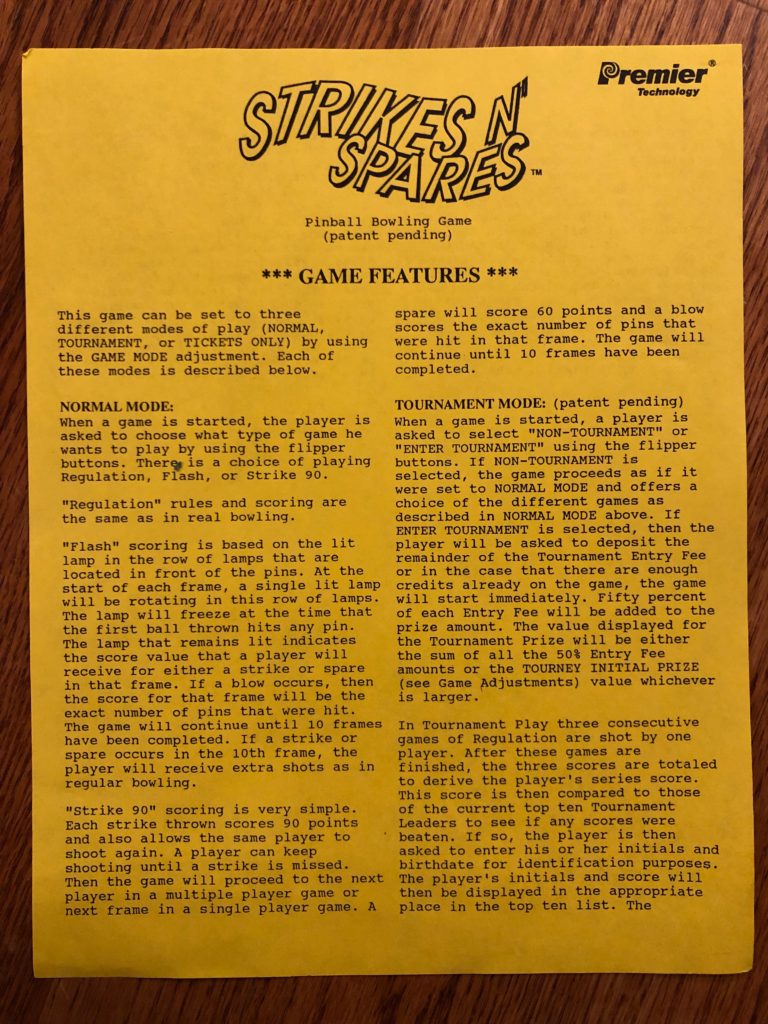
The game plays like you would expect bowling to work. Because it’s electronic, there are advantages to the real thing. First, there are 3 games that can be played. Regulation bowling where the goal is to bowl a “perfect” game (300 score). There are 2 other unique games. One is called flash and works the same as regular bowling with the added challenge of scoring the most points by making your strike or spare when the under playfield flasher is at the highest point scoring position. A strike can score 400/600/800 depending on your timing. This game adds a significant challenge to the regulation version as you now must not only aim your shots (bowl) but you must time them as well. The third game is called “Strike 90” and simply changes the scoring of regulation to make spares worth 60 and strikes worth 90. If you make a strike, you keep shooting until you don’t! It exponentially increases the value of your ability to clear a spare or make a strike. All of the games are fun but the “Flash” version is certainly the most challenging.

Tournament rules as specified by Premier

Tournament Mode For Cash

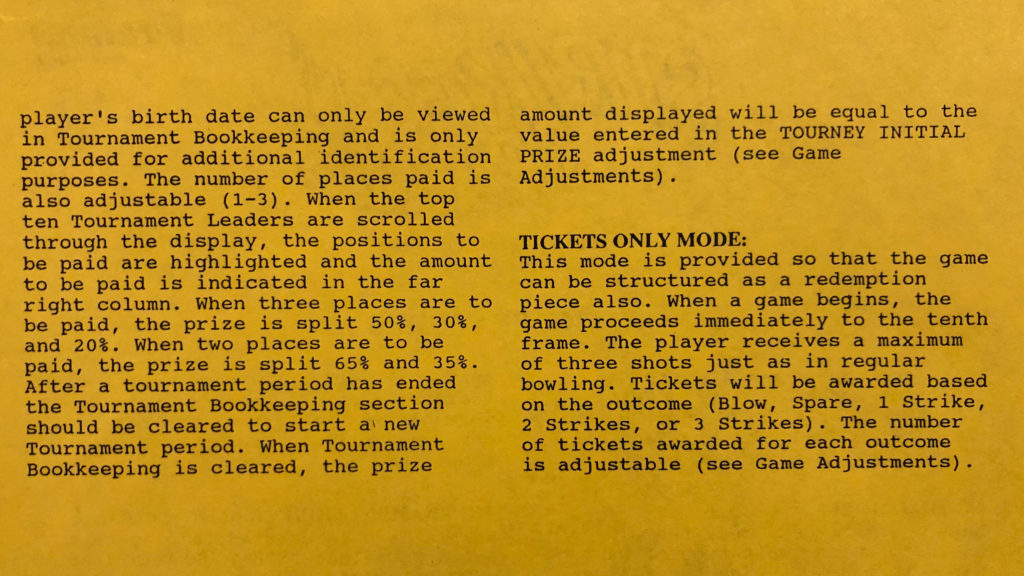
This game also has a programming mode to be played as a tournament with cash payouts. When set in tournament mode, you put money in the machine and if you choose tournament mode, you will put in additional coins to pay for your entry. You will then play 3 consecutive games to get an average or “series” score. When completed, if your score exceeds others that have bought into the tournament, you will be asked to add your initials and your birth date for verification. Only the operators can see the birth date and will use it to make sure that you are indeed the winner. Winnings paid 3 positions deep are split 50/30/20%. Because players are always asked to “buy in” to the tournament, the operator and the establishment would always “get their share”. In other words the players were funding the pot. Seethe images for the actual tournament rules. I’m not sure that I’ve seen them reliably reproduced anywhere

Tournament rules continued

Really Big Balls

It’s interesting that I now own the only Pinball machine (that I know of) that uses SMALLER than regulation pinballs (Big Betty’s Truck Stop) and another that uses LARGER than normal ones. Strikes ‘ N Spares balls are 1.25” in size. Even though that’s only 3/16th larger than a normal pinball – it seems much larger. Because they are an “odd” size, they typically sell for about 5x the price of standard pinballs.

American Bowling Congress “299 game” ring from 1995

Kid sized

This is one (of several) Gottlieb machines that came with 2 sets of leg mounting holes. There is a lower and an upper set of holes. The lower set will raise the machine up to normal, adult player height. The upper mounting holes effectively drop the playfield down to a more kid friendly height. An interesting way to allow operators to cater the machine to each locations clientele

Playing alone?

The game is an absolute favorite at our house when you are talking about non-Pinball people. They actually like to play it. This is from people that have no desire to play regular Pinball. There seem to be a few reasons why. No matter how good the “other guy” is, your turn is coming up FAST. Games can be played in as fast as under 5 minutes if you wish. The competition has the same number of shots you have … 2 per frame. It’s so much different than when I play Pinball against a newbie. Sometimes on a Pinball game, I’ll play for 15 minutes and when the unskilled player finally gets a turn – they drain in seconds. Strikes ‘N Spares is refreshingly different. I think another reason is that the skill (at least on Regulation) is very straightforward. Aim the ball, and flip the flipper. The rules are easy if not already understood. Everybody has bowled at some point in their life. My youngest daughter will have some of her young friends over and they would never consider playing Pinball – yet … they have no problem playing this game.

When we play, in order to give both flippers an even “work out” we require players to alternate flipper sides as they bowl each frame. This also introduces some challenge if you have better aiming skills with one side or the other. The game has 2 complete DMD displays used in various ways during gameplay. Most importantly when you are playing a 4 player regulation game, you can see normal bowling style scoring for all 4 players at once. The game doesn’t have a huge variety in call-outs/sounds but one that stands out is the “Turkey” – both the image and the gobble sound when you get 3 strikes in a row. It’s a cool reward for bowling well and all who play the game look for it. The light show is simple but informative to the play. When you get a strike the red, yellow, then white flashers on both sides will light in sequence and then flash. A spare will light just one side depending on which side of the alley the spare was made. Again, these simple light cues are a real nice reward for clearing a spare of pulling off a strike. Feels like you accomplished something!

So back to playing alone. How is it? Not so good. You might do it once in a blue moon, but it’s not going to be the same as with a Pinball machine. It’s just not as fun as with a partner (or multiple partners). So my recommendation is to have this in a larger collection. It’s fun as heck with a group or even with just one friend. I’d say that most of us collect these things to have others come over and enjoy them WITH us. If that’s the case then this is one of the best bang for your buck machines you can buy. People really like to play it, even if they don’t “get” Pinball. It’s waaaay smaller than a full sized bowler, even smaller than a puck bowler and no need to put your bowling shoes on. About the most fun you can have without a real bowling ball. Well done Gottlieb!

Smart Switches & Game History

I usually post nearly 100% original content here but because information about the game is very hard to come by I am posting some info from another website. John Buras was the game designer. The below info is credited to the folks at the “PA Pinball” site and comes from an interview with John. This was John’s response to the question of how he came up with the design for the game. “I designed this game back at Gottlieb/Mylstar shortly before the company was closed.  I then brought the design along when I started at Premier, but it did not get made until the last days at Premier.  My original design did not have any of the flash, such as the animated bowling pins like the final version had.  Since I was involved with other duties at Premier, Ray Tanzer took my prototype design, and enhanced it.  I initially had the idea for this game, because the puck bowling machines were so popular at the time.  Many locations could not fit these bowling machines in their places, because of their size though.  I thought that this game could possibly fill a void, and turn people on to pinball as well.”

Series of Gottlieb “smart switches” under the Strikes ‘N Spares playfield

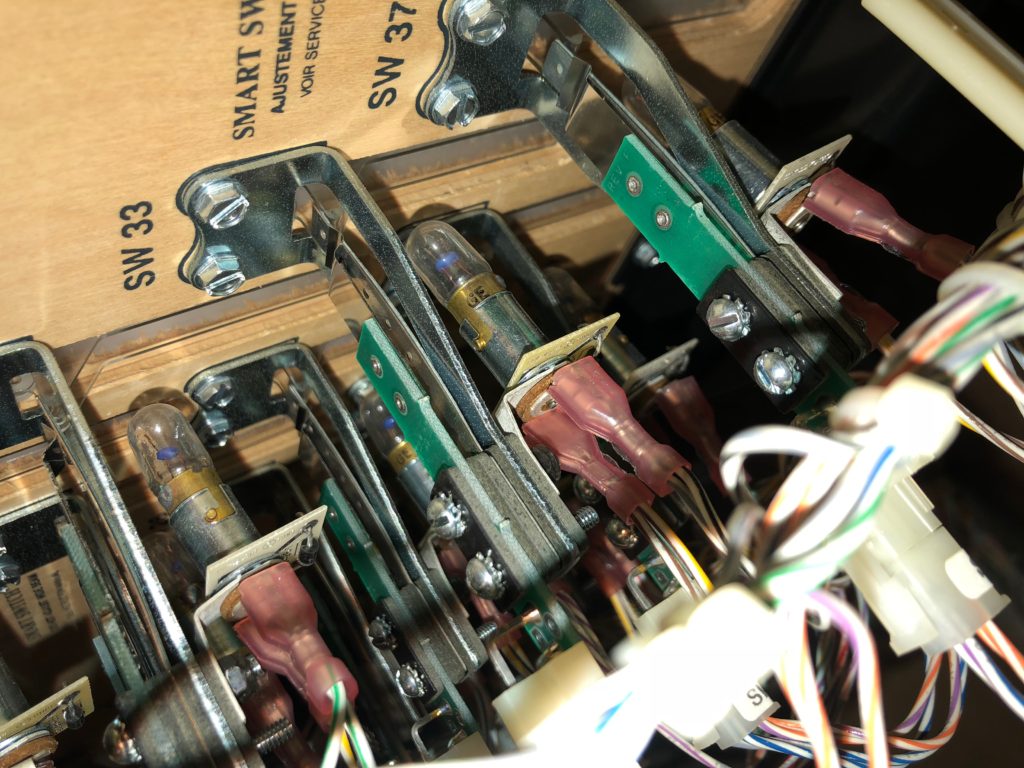
They then asked John about his involvement in the development of the Gottlieb “smart switches”. These switches are used on this game are very unique. John answered first by describing what they are “The Smart Switch is basically a device which translates mechanical energy into an electrical signal, that is similar to that of a mechanical switch made with contact points, but with better reliability.  The switch design was based on the properties of piezo film.” John went on to share why it was important to develop them. “One of the biggest complaints over the years after pinball went solid state was dirty switches.  This was mostly due to atmospheric contaminants due to the locations where pinballs were being operated.  If you could come up with a switch technology that would be immune to these contaminants, it would greatly reduce the maintenance on a machine.  This was very important, because pinball was always fighting the fact that the machines required more maintenance than a video game.  Anyway, I worked on the design with an outside company for over a year, and finally came up with a version of the switch, which could be used as a drop in replacement for the standard leaf type switches in many applications.  To my knowledge, the switch was received well.  I often wonder at times though how the switches are still performing in the field, since I left the industry after Premier closed its doors.” Thanks to the guys at PA Pinball for this interview material as so much of this stuff is being lost to time.

High drama lighting

I’m keenly interested to learn even more about this rare and quirky game. If you know of someone involved in the design, reach out to me. If you have some insight into the game that I’ve missed, please share it. The game is unique in the Pinball world and crazy fun with a group as part of a larger collection.


“Tallica Sux”

The story behind the game –

If you’ve read the memorial article I completed for my friend Andy, then you know why I bought a NIB Metallica Premium. If you haven’t read it – check it out at the top of the page under the link “Andy”. He was quite a guy and my guess is you’ll take something good away from having read it. For those that did not read it or if you simply don’t have time, I’ll cut to the chase. I’ve always wanted a Metallica but struggled with the theme and music. Loved the gameplay, loved the artwork. My buddy Andy had a really nice MOP LE version and Darin has a Refinery Pro that I’ve played many times. There were 2 tipping points in deciding to find one for myself. First, my wife went to TPF with me and played it there. She and I then went to SFGE and she played it there as well. On both occasions she commented how much she enjoyed it. She’s also a huge music and concert fan. As all Pinheads know, it doesn’t take much prompting to go on the hunt for a new Pinball.

Metallica Monster Premium playfield

So maybe 3 months ago or so I began to search. I lost an opportunity to buy a nicely modded premium down in Atlanta – sold quickly to a local. Then Andy tried to help me from his hospital bed by sending me regular updates when a MET Premium or LE showed up locally or on Pinside. Several times the pricing or availability just didn’t work out. Fast forward to October 12th 2018. A day I’ll never forget. I got a text from Andy’s Dad that he had passed away from the illness he had been fighting for almost a year. I balled liked a baby. Then I cried. Then I was sad. Then I got a little angry. Angry that Andy wouldn’t be here anymore. Wouldn’t come over to play Pinball anymore. Wouldn’t be able to come see the new house and Pinball space we were building. Right at that moment I was checking my Facebook feed when my sister posted this message. “Make him proud and buy a pinball.” No way. Listen, I’m building a new house. Putting all my funds into that right now. Heck, I don’t even have space to set even one more up.

But …

I was just emotional enough that I did just that – I ordered another Pinball

The check was in the mail

I texted my distributor to see
availability. He said yes. I said “how much”. He gave me the
price and I said “how do you want to get paid” – all done, one
day. New Metallica Monsters Premium bought. You can read more about
that in the Andy memorial article if you want, but that about sums up
the “why”.

So what about MET? In this post I’ll
try to answer a few questions about unboxing, modding, playing and
living with one of the bestselling modern Stern’s of all time.

That’s whiskey, not Pinball!

Let’s start with the pickup process. Bit of a story there too. After placing my order with my distributor. I didn’t hear anything for almost 2 weeks. I sent a gentle reminder email and got a response immediately “It’s shipping this week!” Super, I thought, just a few more days and I should get a call from him letting me know shipper, pro #, etc. No word all week up until at least Thursday. No call. No email. Nothing. Not a big deal as I really didn’t expect delivery that week anyway. Friday afternoon, I’m walking out of my office to head home for the weekend and my phone rings. Local number but I don’t recognize it. Usually I ignore because they are spam/robo calls, but on this occasion I answered it. Turns out it was a local freight company. “We’ve got a piece of freight for you on a pallet.” “Is it a Pinball game?” I asked?

Yup! I asked where they were located and after a few minutes of back and forth I discovered they were 5 minutes from my office and as a bonus – I drove the pickup to work that day. Double bonus … they were open until 6:30. I told the guy I was on my way.

BOL for my new Metallica Premium

I arrived and finally found the correct door to enter. Climbed a set of stairs to get to the dispatch office, opened the door and was met with a blast of hot air. I found a small cheaply paneled room with space heater cooking on high. I peeked around the corner and found a young man all smiles and eager to help. I told him who I was, he asked for my license and took a photo copy of it. Returned my license and had me sign a document. He then asked me to follow him down to the dock area.

On the way down he proceeded to explain to me that the Pinball was in the very last trailer and he couldn’t remember what part. We walked the length of the docks to the last trailer where he quickly disappeared into it. He re-appeared a few seconds later and said “It’s at the nose” – “don’t worry though, it won’t take but a few minutes to unload this thing.”

I watched as he unloaded about 40 total feet of a 53 foot trailer. Now I’ve watched lots of guys handle a forklift but seriously – this guy had skills. Still took him about 15 minutes because the entire freight load was all “Kilz” paint in various package forms. From gallons to boxes to 5 gallons and up – they had every type of package that Kilz could come in. And it was heavy. So it took time. Cause sometimes the pallet wouldn’t let go of the forks without some serious persuasion due to the weight. He finally says “I can get to it now” and a couple seconds later he appears with a box lying flat that looks about the size of 2 large pieces of luggage. He says “Want to inspect it first?” I said “No need – that’s not it!”. He said “It’s not?” After I convinced him it was not a Pinball machine, we both went back into the trailer to closely see that very last big box touching the nose of the trailer. That wasn’t it either. It was a whiskey display – ugh, this was gonna a take a while.

We walked all the way back to the first
dock (the only other trailer with freight in it) and sure enough,
about halfway down was the Stern logo peering back at me. I pointed
to it and said – that one. He started the emptying procedure all
over again and finally, after 35 or 40 minutes I had the MET Premium
leaning against the back of my truck. With another set of helping
hands from him, we tipped it in and away I went. Homeward bound with
one of Andy’s (and soon to be mine) favorite pins!

Fresh Pinball, right off the loading dock

Truck this side only

I got home and my usual helper (Chris) was getting some well-deserved sleep after a long overnight shift. The weather looked threatening. At least it looked threatening if you have a $7,000 Pinball machine made of wood and electronics sitting exposed to it. What to do? You know the answer. Cut the pallet off the bottom, pull it to the edge of the tailgate, let gravity assist and slowly lower it to the ground. Now tip it upright, grab your freight 2 wheeler and drag it to the front door! Now pull it up those steps – Nope! This is where I was stalled. I weigh 165 soaking wet and am plenty strong enough for most Pinball work but manhandling a NIB up stairs without an Escalara isn’t in the cards. I left it at the bottom of the steps.

Stuck, alone and frustrated – poor me

Chris woke up an hour later and within a minute we had it in the house safe and sound. We took a dinner break and then when we returned it was back to the MET unboxing. I cut the left and right corners down full length of the “Truck this side only” and then peeled it down. We pulled the legs out of the main container, loosened and removed the pre-installed leg bolts,then attached the front legs

Chris getting the front legs on – always willing to help!

Setup from here goes pretty quick. I always add some sticky felt to the leg leveler bottoms because we have our pins on hardwood floors. With that done to the front legs, it’s a matter of tipping the machine down so the front legs are now touching the ground.

Front legs on

Now lift the back of the machine (helper needed) and I put my DIY 4×4 post under it for support. Add the back legs and you’re ready to cut the band that holds the head for shipping. After cutting the band, lift the head, be careful not to pinch any wires going into the backbox. Have your head bolts ready and as soon as the head is vertical, insert the head bolts and finger tighten until you can finish with a 5/8th wrench. Boom – the game is up.

Game is up and so are the legal warning papers – something about cussing

For Metallica, there are just a couple more things to do. Pull the power cord out of the recessed hole in the back of the machine. Mine was wrapped around the transformer so make sure you open the coin door and have your helper pull the cord while you watch and guide if needed. Next I pulled the glass and removed the strap tie and foam block around Sparky. Pull off all the other “Adult language” warning papers, assembly papers, etc. and add 4 balls and you are ready to play!

Take a quick pic of your serial and file it on Pinside

Take a picture of the serial number of
your game. I’m surprised at how many folks don’t keep a record of
this. Take that picture and the next time you are on Pinside,
navigate to your collection page and add that number to the notes.
Not only do you have an image of it but you have a backed up record
of it that you can access anywhere in the world. I know that pins are
rarely stolen but if ever that happens or there is an insurance claim
– you’re prepared.

Screw in the shooter lane – bet that hurts

So we plugged it in. Hit the rocker for power and just like it was supposed to do – it came on. Awesome job Stern. It works. Even after shipping. Not an easy accomplishment. I pushed start. Nothing happened. I have done this dozens of times, still gets me every time. So into the menus I went to set the game on free play. Now I hit start – again. We played maybe 4 balls or so and on the last ball Chris was playing, the launch seemed a little “off”. He drained. I stepped up and pulled the plunger and the ball moved to the forked part of the launch guide and stopped dead. Powered off the game and grabbed the flashlight. A screw had neatly wedged itself into the shooter lane forked area

Screw in the shooter lane

It literally took 10 minutes to get the very tightly wedged screw out of there using my magnetic rod and gentle prodding. With the screw removed it was time to find out where it came from. It took just 5 seconds to find that.

The screw UNDER the top post fell out (inserts into hex post)

Right above that area is a clear plastic placed to prevent captive balls during gameplay. There are 2 screws that insert into hex posts from underneath. One had fallen out, the other was on the way. Two drops of blue Loctite and we were back in business. Before we slid the playfield glass back on, I noticed that one of the retaining bolts for the rising cross mech was protruding from the playfield. It simply looks like it was not tightened down enough at the factory. Not sure it’s a problem as the ball doesn’t seem to be able to impact it because it’s so close to the edge of the ball guide. To date, I’ve just left it as is.

Mounting screw not seated fully into playfield

Mod it like you mean it

We played a few more entire games and as much fun as the game play is on MET, I was missing the subwoofer and shaker motor. It was time to mod. As you’ve already read, I had some time before this machine arrived. So I spent some money. Too much. On too many mods. The following is the list of mods we installed over the next 5 hours in total:

  • Green slingshot
    and inlane protectors
  • Polk audio 10”
    subwoofer
  • Pinnovators
    subwoofer out kit (Sam)
  • Snake tongue
    decal
  • Pinball side
    mirrors
  • Pinstadium
    lighting kit
  • Shaker motor
    (rev B)
  • Shooter eject
    protector
  • Shooter lane
    mylar
  • Magnet mylar
    circle
  • Mantis scoop
    protector
  • 3 crosses at
    rollover lanes
  • Lighted
    cemetery arch
  • Sparky
    protector plastic
Mods and more mods!

Guess what? I’m not even close to done! I’ve still got the following to add:

  • Custom Dirty Donnie Sparky (on the way)
  • Sparky helmet EL wires (here)
  • Lighted hammer LED mod (here)
  • Snake fangs kit (on the way)
  • Sculpted snake kit (here)
  • Cliffy switch slot protectors (on the way)

And … on my wish list

  • Color DMD
  • Custom purple armor

Let’s review how each of these went and provide tips and tricks for install where we can

Dirty Donny and Miss Tami – (George Gomez photo bombing)

Slingshot/Inlane protectors –easy install. Clip the white wire ties that hold the wires on each spotlight above the slings. Remove the spotlight from the post.Remove the hex post, then remove the remaining nuts from the other 2 corners of each sling. Remove and discard (put in coinbox if you wish) the metal washers that Stern provide for protection. These can’t stay as the added height of the fluorescent protectors won’tallow the nut to catch enough of the threaded post. Beside the protectors are doing the job the washers were before. When you assemble, make certain the drop zone of the right habitrail is pushed away from the newly added protector or it will hang up (ask me how I know)

Clip that white wire tie, remove the steel washer “protectors”

Subwoofer – easy install. Use the Pinnovators web page install instructions. Run an extension cable to your sub. Make sure you have a splitter so you can use the “line in” section. Plug in sub, good to go

Close up of the splitter that allows you to use the cleaner “line in” connection

Snake tongue decal – clean any oil off snake mech base where tongue decal will be placed. I use some alcohol. Thoroughly dry the area with small piece of paper towel.Remove paper backing from decal, then use a small flat blade screwdriver to stick just the very tip of the decal to it. This will allow you to place the decal perfectly. Once positioned push down to ensure adhesion. 60 second install.

Best inexpensive mod – snake tongue decal

Side mirrors/Pin Stadium – this was a package deal install. I noticed my PF was super tight to begin with- barely enough room for the mirrors on each side. There was NO WAY I could fit the Pin Stadium magnets ON TOP of the side mirrors so … I placed the magnets for the Pin Stadium on first, then installed the mirror blades directly below the magnets – butted up tight to them. Worked like a charm! Even so, the magnets from the Pin Stadium are so tight they have actually shaved some wood from the edge of the Pf as I have raised and lowered it. No biggie as you can’t see it and a testament to the adhesive properties of the Pin Stadium magnets because they have not budged!

Place Pinball Side Mirrors just under the Pin Stadium magnets

Shaker motor – a pretty typical install. All the wiring you need is in the cabinet already. The instructions are typically confusing and they don’t disappoint here. I’ve put in dozens of them so I wish I would just stop reading them. Again they confused me and added 5 minutes to a 15 minute install. Add the circuit board (side of cab is already drilled – yay!), mount the shaker (T-nuts already in place – yay!) Plug in 2 sets of wires, add the cover (in my experience the hardest part) and you’re ready to use it.

Instructions on these are confusing but the install is straightforward

Shooter eject protector – Not an easy install. If I had it to do over again, I would simply drop a piece of custom cut mylar in there. Here goes. Remove the two nuts holding the front of the apron down midway down the outside drain lanes. Remove the 2 screws holding the back of the apron in place where the playfield brackets intersect and lock into the lock down bar receiver. Unplug the J connector that sends power to the apron lighting. Remove apron. Remove the top 2 screws from the eject mech (left and right side). Now the tricky part. Bend, twist, cajole, nudge, tweak and wish this protector into place. You will need to do 3 things at once. Get it under the eject lip, under the entire eject mech with mounting holes aligned and pop it over the wire guide – good luck without slicing your hands off. Seriously be careful. It would be MUCH easier to remove the entire eject mech but I was too lazy. Total install 30 minutes

Wowser – not easy but it fits well and should protect well too

Shooter lane mylar – cut it to fit (rectangle) fit it tight to the left side of the shooter lane. Then use a right angle pick (the outside elbow or bend) to press it down from left to right. Don’t just try to shove it in there or it WILL stick but it will leave air gaps wherever it crosses a sharp angle. Just slowly push it down left to right. When you get to the right side you’ll want enough material left to climb all the way up the black part to protect as balls fly out of the eject mech. This right angle crease is important to “fold into” using your right angle pick (use the outside elbow of that pick as it makes a nice crease in the mylar but does not tear it) 5 minute install

Shooter lane mylar – that crease on the right is critical to it remaining stuck in place

Magnet mylar – I always keep several sheets of mylar around. I traced the inside of a roll of my electrical tape and cut that circle out using my tool/scissors. Wax the playfield first and if you need to remove this later, it will come off with no damage. Remove backing and add over magnet area. I did NOT cut out the magnet. I left it covered with the mylar and it works just fine. 2 minute job including cutting the circle out.

Custom cut mylar circle – sounds cooler than it is

Mantis scoop protector – Remove all the screws that mount the scoop toe the playfield. Slide in the mantis protect under the loosed mech. NOW – be careful as you slide and push this into position in the scoop hole. It’s easy to catch a piece of errant clear coat and chip the clear as you push the mantis UP into the scoop hole. I know because I’ve done it on MMR before. Take your time on this one. Once it’s placed, you will use ONE of the original scoop mech mounting holes to hold the protector and you will need to drill a second. I use a small handheld drill and a 1/16th bit. NO need to go deep. Place the scoop back as it was, add your new hex head screw and this one is in the books. Took about 20 minute’s total. Not hard at all. Worth the effort. No extraordinary rejects from the scoop at all during gameplay. Highly recommended.

Mantis protector – installed from underside

3 crosses – Super easy install BUT the one on the left hits a clear protective plastic (one of the arms on the cross) so I had to fiddle with it to keep the crosses straight and aligned with each other. I actually pulled the left cross off the aluminum mount and re-positioned it higher. The adhesive is very sticky so it allowed for the re-positioning. Problem solved. Total install should be 2 minutes. Actual install was 15 minutes +

Simple but elegant mod

Lighted cemetery arch – Not complex at all. Instructions should be a little clearer. But you can figure it out. Follow the Mezelmods instructions on line. I’m still wondering how to secure the wiring even though it doesn’t get in the way of anything – just kind of sits there. Also don’t think that the mod is as “dramatic” as I would have thought it to be.Still looks good as a sculpted piece though.

What to do with that wire??

Sparky protector – I ordered the green fluorescent and once installed did not like it at all. I’ve since reordered the thinner clear version and will install that instead. The green was too much up around Sparky and this protector was very thick. Looked fantastic in design though with engraved spider webbing.

You cussing at me??

So what do I think about Metallica game play? Wow. I’m impressed. It’s a great combination of hard shots with easier repeatable ones. It’s easy to get to multiball. It’s a challenge to drive the ball up that fuel lane. It’s easy to hit Sparky. It’s hard to hit that left ramp. It’s easy to backhand the graveyard. It’s hard to hit it from the right flipper and not go STDM.

Beautiful artwork by Dirty Donny Gillies

I never listened to Metallica growing up. I AM a huge music fan. At one time I had over 7,000 records in my collection. Yes, metal was part of it. Just no Metallica. To be honest, it’s not bad. In fact for a Pinball game it’s absolutely perfect. I wouldn’t change a thing. If you don’t think you would like it because you already know you “hate Metallica” (or as Sparky puts it “Tallica Sux”) then give it a play first. There are simple menu settings that you can use to turn the volume of the music down to your liking if you so choose. I ended up turning my music UP not down. To turn it UP, go into the game adjustment menu and select #134 (music attenuation) and change it to say -40. Yup, you read that right, MINUS 40. The higher the negative number the louder the songs are! Metallica music is OK by me.

Eye candy courtesy Stern Pinball, Pin Stadiums and Dirty Donny

What can I say about the artwork – it’s stunning. Dirty Donny is no doubt the man when it comes to this hand drawn art style. It captures a metal band perfectly and from what I’ve heard from true MET fans it captures this band to a “T”. Great job Donny Gillies! We met him at Texas Pinball Festival last March and he’s just a fun guy too. I know that Miss Tami will love her custom painted Sparky from Donny when it arrives.

Gorgeous playfield lit up by Pin Stadium lighting

The sound … the glorious sound package in this pin. It is nearly perfect in every way. The only improvement might be if the entire hardware system was replaced to perform at the level that Total Nuclear Annihilation or Alice Coopers Nightmare Castle are at. This sound package is so good it deserves better hardware – better fidelity. With that said, let’s review some of the highlights. Like the double bass drums tied to the spinners – genius and sounds amazing through the sub. Like the adult language callouts. I’m not a fan of cussing but I am good at it. I also recognize that this IS probably an appropriate place for it. I play the game with the volume around 40 and simply love the feeling of being at a concert or better yet, an event like no other. Adrenaline, excitement, music, skill, lights, sounds and vibes from the shaker – Pinball at its best!

This band is hot!

I live on 30 acres and will typically burn all the paper I can in my burning barrel. Saves trash space. Saves me hauling it ¼ mile out to the road each week. So, after setting up Metallica, it made sense to drag the box out to the burning barrel and get rid of it. I pulled one of the leg boxes out of it (nice long square chimney shape if you know what I mean) and I lit that at the bottom and tossed it back inside the bigger box. I can’t resist a great image so as the box began to burn, I snapped a few. The last one is amazing and as I clicked the image using my iPhone, I was nearly burned in the process (I was many feet away but wow, was that hot!). A fitting end to the box that held the pinball machine that represents a band known for their over the top performances and music – rock on